Tampilkan postingan dengan label onion. Tampilkan semua postingan
Tampilkan postingan dengan label onion. Tampilkan semua postingan
Jumat, 04 April 2014
Onion Bhaji Recipe

Onion bhaji step-by-step video recipe by Chef Jeena.
See chefs latest oven baked onion bhaji recipe using chickpea flour.
See chefs latest oven baked onion bhaji recipe using chickpea flour.
Here is Chefs - How to make the perfect onion bhaji recipe ... and do not just take my word for it...why not read this independent > onion bhaji review
Not only are Chefs onion bhajis healthy, cooked in the oven and eggless, but they are the most DELICIOUS ONION BHAJIS EVER guaranteed!
Chef cooks this onion bhaji recipe almost daily because the taste is that good.
Chef likes to be modest but I have to tell you that these are the best onion bhajis you will ever taste.
The spice measurements are perfect in quantity and blend into such an aromatic flavour. Half way through cooking Chef drizzles some oil on the onion bhajis and this really gives them a deep fried flavour.
If you cook these onion bhajis for friends they would certainly believe that they have been deep fried, yet they are cooked with healthy oil and baked in the oven.
Chefs secret ingredient for this onion bhaji recipe is using buckwheat flour as the taste is absolutely amazing, if you can only find chickpea flour try Chefs other onion bhaji recipe which uses gram flour.
If you give Chef Jeenas Onion Bhaji Recipe a go... I guarantee you will be delighted by the wonderful taste.


Ingredients..
5 Small Onions
5 Tbsp Buckwheat Flour
1/2 tsp Salt
1/4 tsp Cumin
1/2 tsp Coriander
Olive Oil
1 Large tsp Tomato Puree
1 and 1/4 Shot Glass Measure Water (a small egg cup can be used to measure)
Spices for the Pan..
1/2 tsp Turmeric
1/2 tsp Ground Coriander
1/4 tsp Cumin Powder
1/4 tsp Ginger Powder
1/4 Chilli Powder
How to make perfect onion bhaji recipe
Cut the onions in half then cut into slices, not too thick nor too thin.
Drizzle a little oil into a large pan/wok and gently cook the onions until they start turning soft and translucent in colour, do not brown them or over cook them.
This should take no longer than 10 minutes, keep stiring the onions so they do not over cook.
Drizzle a little oil into a large pan/wok and gently cook the onions until they start turning soft and translucent in colour, do not brown them or over cook them.
This should take no longer than 10 minutes, keep stiring the onions so they do not over cook.


When the onions are ready sprinkle in the chilli powder and mix well.
Straight after add the turmeric, cumin, ginger and coriander, stir well again then switch off the heat.
Straight after add the turmeric, cumin, ginger and coriander, stir well again then switch off the heat.


In a bowl place buckwheat flour, salt, coriander and cumin, mix together well.
Now place the onions into the bowl and mix well again.
Once the flour mixture has coated all of the onions place the tomato puree into a shot glass/small egg cup and fill with water.
Mix the tomato puree with the water then pour this into the onion mixture.
Fill the shot glass/small egg cup just one quarter full with water and add to the onion bhaji mixture, stir very well.


The mixture should be wet and easy to stir but not watery or too sloppy in texture.
If you added too much water add a few pinches of flour till you get the right consistency.
If the onion bhaji mixture is a little too thick and dry add a little drop of water at a time till it loosens up.
Do try to keep to Chefs measurements as the bhajis can turn cake like with too much flour and liquid.

Drizzle some oil onto a baking tray, place two tablespoons of the onion bhaji mixture onto the oven tray per onion bhaji - flatten a little with the back of a spoon.
Place into a hot oven at 180C for 10 minutes.
Place into a hot oven at 180C for 10 minutes.

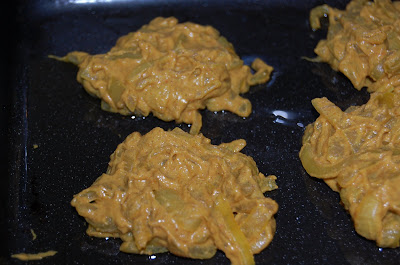
After 10 minutes take the onion bhajis out of the oven.
Drizzle a little oil over the tops of the onion bhajis.
Place back in the oven for 5-10 minutes or until golden brown.
For the full deep fried effect of the onion bhajis you must drizzle on the oil half way through.
Drizzle a little oil over the tops of the onion bhajis.
Place back in the oven for 5-10 minutes or until golden brown.
For the full deep fried effect of the onion bhajis you must drizzle on the oil half way through.


When the onion bhajis are golden brown they are ready.
Take out of the oven and remove straight from the tray to a plate.
Take out of the oven and remove straight from the tray to a plate.


Enjoy Chefs best ever onion bhaji recipe.
They are so very delicious and very healthy.
They are so very delicious and very healthy.


*****************************************
Enjoy Chef Jeenas onion bhajis.
Onion bhaji step-by-step video recipe by Chef Jeena.
See Chefs latest oven baked onion bhaji recipe using chickpea flour.
*****************************************
Enjoy Chef Jeenas onion bhajis.
Onion bhaji step-by-step video recipe by Chef Jeena.
See Chefs latest oven baked onion bhaji recipe using chickpea flour.
*****************************************

Minggu, 26 Januari 2014
Frenchs Crunchy Onion Venison Steaks

Servings: 4
Prep Time: 10 minutes
Cook Time: 10-15 minutes
Ingredients:
- 20 oz. of venison backstraps
- 1 package of ranch seasoning dry mix (or favorite dressing)
- 2 cups of Frenchs Original Fried Onions
- 2 tbs. all-purpose flour
- 1 egg, beaten

Cut tenderloins into desired sized pieces for each person. Lightly coat each with ranch seasoning dry mix. Dont overdo it. Its very salty. You may not even use the entire package. If using a wet marinade, let it sit for at least 30 minutes.

2. In a ziplock bag, combine 2 cups of Frenchs Fried Onion and 2 tbs. of flour. Crush with hands or rolling pin.

Place venison on a baking sheet and bake at 400 degrees F for 10-15 minutes. 10 minutes for medium-rare.

Got a recipe you want us to try? Send us an email at foodforhunters@gmail.com Please note that we are limited to the wild game thats available to us. You can also choose to photograph the recipe yourself. If you do, please send a well composed, clear photo and the recipe. No phone photos, please!

I was born and raised in South Florida. Grew up in the outdoors with my dad; I was the son he never had. I used to do everything with him, from fishing, to working on trucks and heavy machinery. When I was about 16, we started duck hunting together. Then I met my husband who I married this past November. He introduced me to archery and really started my passion for the outdoors. We live to hunt, and hunt to live. We do everything in the outdoors together. Im proud to say that Im a hunters wife, as Im sure hes proud to say that hes a huntresss husband! Haha.
This photo of us was from 2010 when I harvested my first deer, a big South Florida public land 8 point. He was so proud of me, and of course, I was extremely proud of myself. It took a lot of hard work and years of scouting in the same WMA, but well worth it! I was also pregnant with our first daughter here, and the hunt happened right before we found out. Our daughter has definitely proven that shes an outdoor girl for sure. Shell be two in July and loves hunting and fishing with us every chance she gets!
Langganan:
Postingan (Atom)